Skip to content
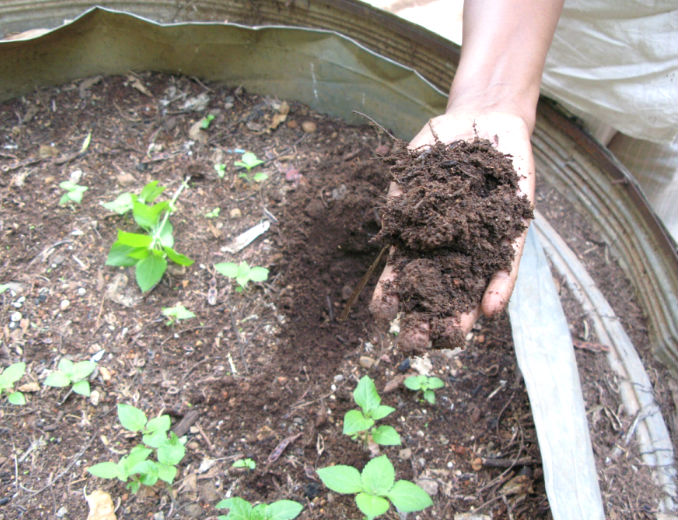
I have recently visited a dear friend, Anette, who lives in a small town near Stuttgart in Germany. Like most German people, she is very concerned about the environment and obtains food from organic farms whenever it is possible.
Instead of using artificial, synthetic and costly fertilizers that may also harm the environment, she uses compost as a natural way to improve the quality of the soil in her small but impressive vegetable and flower garden.
Her lifestyle has also inspired me to learn more about composting and how to use it in my own garden.
Here are some of the main things I have learned about composting that may be useful for you as well.
BENEFITS FOR THE SOIL
Compost is the final product of the decomposition of organic materials like leaves, fruit and vegetable scraps and grass trimmings. It’s nature’s own way of recycling and producing a valuable organic fertilizer, enriching and saving the environment and saving your money at the same time.
Compost is a precious ingredient for your soil. It has a big effect on soil structure. It binds together soil particles into clumps, making it easy to dig and penetrate. This also prevents soil and wind erosion and helps soils with too much clay or sand. When clay soil dries out, organic materials prevent cracking and water run-off.
It improves soil by providing nutrients to worms, fungi and bacteria that live in it. In this way, the living beings recycle the nutrients into forms that are directly available for plants to absorb through their roots.
Adding just a little compost can do wonders for your garden.
Ned Conwell, a teacher and a co-owner of a produce and flower farm in Pescadero, California, has said: “Once it’s in the soil, compost increases fertility, adds both micro and macronutrients, buffers pH, and improves soil structure.”
COMPOSTING COMPONENTS AND TOOLS
Four equally important components are essential for the effective work of composting organisms: Nitrogen (green ingredients), Carbon (brown ingredients), oxygen, and water.
To achieve a good balance for your compost pile, you will need a 50/50 mix of green and brown components. You need to make sure that the material is cut into smaller particles as they break down more quickly.
The “greens” and “browns” need to be properly balanced in order for you to obtain the right mix. Greens decompose quickly and release nitrogen and moisture. The browns decompose more slowly and provide fiber, carbon and create air pockets in the mixture, necessary for keeping the compost healthy. Here is a list of commonly used green and brown materials:
“GREENS”
-vegetable peels, fruit scraps, salad leaves
-grass clippings
– tea bags
– young annual weeds that have not seeded
– spent bedding plants
-coffee grounds
‘’BROWNS”
-sawdust (from untreated wood)
– wood chips
– paper and cardboard
-eggshells
-tea bags
-hay and straw
DO NOT COMPOST
-chemically treated wood
– diseased plants
– meat, bones and dairy products
– fats, oils and cooked food
– glossy paper, paper with colored ink
– human or pet waste
Apart from providing the organic waste and finding the place to keep your compost, it will be helpful to use these tools: a pair of thick gloves to protect your hands, a pitchfork to turn the heap and transport materials to it, shovels to transfer compost to the garden or add organic materials to the heap, a wheelbarrow for larger gardens and screens to separate the larger bits of compost that have not decomposed yet from the ready- to- use compost material.
SETTING UP THE PLACE FOR COLLECTING COMPOST
You can either choose to obtain or make a container for composting or use a freestyle heap method.
Let us explore some of these methods and you can select the one that suits you the most.
-Do-it-yourself garbage can: You can turn an inexpensive large plastic garbage bin into a compost bin, which is ideal for smaller gardens. To provide the essential airflow, use a drill to make 5-6 holes each in the sides, in the lid and bottom of the bin.
– “Trenching” method: You can dig 8 feet deep trenches in the ground and bury organic materials and scraps directly in the garden beds. This should be done at least two months before using the area so that nature can perform its work beneath the soil.
– Binless “heap” metod: You can just select a place in your garden and begin layering organic waste into a pile. To protect it from animals that seek food and to disguise it, you can cover it with some soil.
– Do-it-yourself wire compost bin: You need to buy about 10 feet of 36- inch wide wire. Choose an open place in your garden, then put 3-4 stakes into the ground, placing them in a desired shape, rectangular or circular. Stretch the fence around the stakes and attach it to each stake with staples or zip ties. A bin constructed in this way will enable maximum air flow and provide structure to an open heap of compost at the same time.
– Commercial bin: If you are not handy or willing, you can always purchase a compost bin at home improvement stores and from online retailers. Some of them can be tumblers, which can significantly accelerate the decomposition process. The negative side is that they can be quite expensive.
– Worm bin: This type of bin is not for squeamish people, but it is very suitable for gardeners in urban areas where the space is limited. For this bin, you will need a long, rectangular 10-gallon plastic tub, a constant supply of food scraps and shredded paper, and a dozen worms to eat the garbage. You must make sure to use only manure worms (Eisenia foetida), or red worms (Lumbricus rubellus) and not earthworms as they can only survive in large amounts of soil. This container must not be exposed to extreme cold or hot and it requires collecting worm castings or feces, which is not acceptable for some people. The end result, however, is a perfect soil fertilizer full of ready-to use nutrients for the plants.
CREATING YOUR HEAP
Now you need to start creating sandwich-like layers. The first 4 inch layer always consists of hard materials, such as twigs or small branches. This will allow drainage and it also keeps the heap off the ground. The second 2 inch layer follows, made up of “green” materials, then the third layer using the “brown” materials. You need to add water after each layer to provide moisture but make sure that the heap is not wet. Then repeat the procedure in the same order. The heap should be 3-5 feet tall. Finish by adding some soil, which will help reduce unpleasant smells and it will also make compost richer.
Turn the heap regularly (once a week is recommended) with a garden fork to allow air in and to avoid the production of greenhouse gases. If it is wet, you should mix some brown material into the heap and turn it. Turning the heap will also speed up the breaking down of materials.
How will you know that the process is working? The heap will start producing heat. Make sure that you regularly water the compost, since moisture is lost in the heating process.
If the weather gets too cold, you should cover the heap with insulating material.
The creation of compost can last from 6 weeks to approximately one year.
The smell of finished compost is not unpleasant – it is earthy. Its color is dark and resembles coffee grounds. Use it as a fertilizer around trees, new planting areas, in flower and vegetable beds, in potting mixtures, as a top dressing for your lawn or wherever you find suitable.
I am convinced that your plants will show their gratitude by offering you divine blossoms and a rich harvest.