Did you know that growing okra (aka ladies fingers) in pots does not require plenty of space?You can make a hobby of it since it is very easy if you complete all of the planting must-do.
The okra plant is a warm-season tropical vegetable that can also be grown for a decorative purpose. Its delicate foliage and beautiful creamy blooms (that much resemble the bloom of hibiscus) are simply captivating! It is so because the okra plant does belong to the same Hibiscus family.
The okra is very low in calories – it only contains 25 to 40 kcal per 100g. The okra, apart from being a captivating shrubby vegetal, is also a ‘nutritious bomb.’ Research has shown that it is rich in vitamins A, C and P, calcium, and many other minerals.
How To Grow Okra In Garden Containers
My friend Dean Clooney from Minnesota has recommended me to follow these steps to choose the most suitable pot for my okra:
1. Choose a pot of whatever material and shape you like.
2. The pot should be at least 11 liters (3 gallons) in size. Ideally, a 19-liter pot (a 5-gallon pot) that is 25-30 cm (10-12 inches) deep, and about the same size in diameter, would be perfect for 1 okra plant. But if you have a larger pot, you can certainly grow more than 1plant in it. The best to choose is a black-colored pot as okra ‘loves’ to be well-heated that is cozy.
Choosing the okra seeds
The first step toward growing okra is to get the seeds of course. Ask for the dwarf okra variety that will not grow higher than 1.5 meters (5 feet). In fact, you can grow any okra variety in a pot, but it is suitable if you choose the dwarf one. If you live in a climate with rather short summers, then you should search for varieties that mature fast.
Planting time for the okra
The optimal planting time for the okra is when the temperature holds between 13-160C (55-600F), or when all the dangers of frost have already passed. Growing the okra is possible year around if you are positioned in the USDA Zones 9-11, or any other subtropical or tropical region on the Earth.
The okra does not transplant well due to its taproot, so you should directly plant the seeds into the pot, or in a biodegradable pot. Follow these steps:
- Sow 2-3 okra seeds 1-2cm (½ -1 inch) deep in each pot.
- Water with a sprayer and keep the seeds in a bright warm place.
- The substrate should remain moist until seeds germinate.
- The germination process takes place 5 – 10 days after sowing.
- Remember that the more warmth it gets, the faster the germination will happen.
Requirements for planting okra in pots
1. Positioning
Choose a shiny spot that receives full sunlight (at least 5-6 hours of sunlight is essential). Similarly to tomatoes and peppers, the okra requires plenty of sunshine to produce well.
2. Soil
The planting soil must be loamy and crumbly, and it must be well-draining too. So, opt for a soilless potting mix that is high in organic stuff. You can also add a lot of compost [or aged manure] to provide your okra plant with a constant supply of nutrients.
3. Watering
The okra vegetal needs slightly moist soil. Water it regularly to keep the soil uniformly wet, and particularly more from the beginning of the flowering period, till the end of the production period.
4. Temperature
The cultivation of okra is extremely easy, but it requires a lot of heat as with the majority of plants. The plant can grow above 100C (500F), but if you want it to flower and to bear fruit profusely, the temperature ideally must be around 23-350C (75-950F). The plant can bear higher temperatures quite well, but it fails to grow when the temperature drops to lower (that is colder) levels.
5. Okra plant care
- Fertilization: Mix manure with the soil to provide nutrients to the plant. You can also ‘side dress’ the plant with it. At the time of planting, you can also add balanced fertilizer if you like. After the plant has reached the height of 15 cm (6 inches), mix in a dose of balanced fertilizer again. Keep in mind that if your soil is nitrogen-rich, it may promote vegetative growth at the expense of fruiting, so maintain the balance. At a later point, you can ‘feed’ the plant with low-in-nitrogen fertilizer such as NPK 5-10-15 or 6-12-12.
- Pollination: The okra is a self-pollinating plant, so you don’t need to care about the pollination at all!
- Pinching and topping: As you will be growing okra in containers (here we consider dwarf varieties), the plant will not exceed the height of 1.5m (5 feet). In such case, there is no need to take care of pinching or topping!
- Pest and disease control: The okra is prone to fusarium wilt and nematode attack as well as aphids and whiteflies in pests. Mealybugs also affect this plant’s growth. However, these pests actually do more damage on plants grown in larger numbers. As you are growing the okra in pots you can easily control them.
- Harvesting: The okra requires frequent harvesting. Now, isn’t that a great advantage or what?
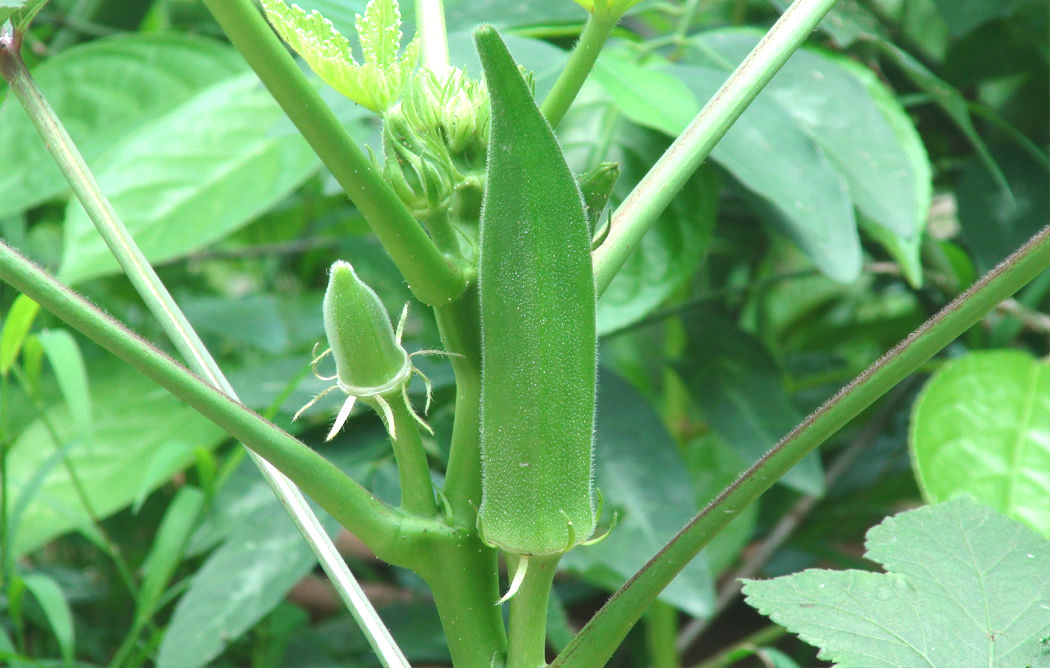
It blooms about 2 months from planting, and the fruits appear 5-7 days after flowering. The fruits/pods are harvested when they are still tender, otherwise, they become fibrous and too hard to be eaten. Ideally, the picking length is between 8-12cm (3 – 5 inches).
How to check if okras are not too late to be picked
To do this check, simply bend the tip of any fruit. If it breaks easily, this means that they are still tender, crispy, and mature enough, to busy your own fingers to harvest these lady’s fingers!
SHARE IT PLEASE WITH OKRA LOVERS TO HELP THEM GROW IT EASILY